You’ve been meaning to stretch more. Maybe your hamstrings feel like steel cables after sitting at a desk all day, or your lower back protests every time you bend to pick something up. Someone suggested yoga. You looked at a class schedule, saw words like “vinyasa flow” and “ashtanga”, felt mildly intimidated, and went back to the sofa. Fair enough.
Here’s the thing: yoga doesn’t have to be complicated, spiritual, or performed in an overheated room by someone who can fold in half. At its most basic, it’s a structured way to stretch your body, build some strength, and learn to breathe properly. You can do it in your living room in pyjamas. No chanting required.
If you’re coming from a home gym background, adding yoga into your routine can genuinely transform how your body feels — especially if you’ve been hammering weights and skipping the flexibility work. This guide covers the poses that actually matter for beginners, how to do them without hurting yourself, and what you’ll need to get started.
What You Need to Start
Almost nothing. That’s one of yoga’s genuine advantages over most fitness activities.
Essential:
- A yoga mat — this is the only non-negotiable item. You need something with grip so your hands and feet don’t slide, and enough cushioning to protect your knees. A basic mat from Decathlon or Argos costs about £10-15 and will do the job perfectly. Thicker mats (6mm+) are easier on your joints but less stable for balancing poses.
- Comfortable clothing — anything that lets you move freely. Leggings or joggers and a t-shirt. Nothing fancy needed.
- A clear space — roughly the length and width of your mat, with enough room to extend your arms overhead without hitting a lampshade.
Helpful but not essential:
- Yoga blocks (about £8-12 for a pair from Amazon UK) — these bring the floor closer to you when you can’t reach it. No shame in using them. Most yoga studios provide them because everyone needs them at some point.
- A yoga strap (about £5-8) — useful for hamstring stretches when your flexibility is limited. A dressing gown belt works in a pinch.
Don’t buy expensive gear before you know whether you’ll stick with it. A £10 mat and some floor space is enough for the first month.
How Often Should Beginners Practise?
Three sessions per week is the sweet spot for beginners. Each session can be as short as 20-30 minutes. You’ll notice flexibility improvements within 2-3 weeks at this frequency.
Doing yoga every single day sounds ambitious but often leads to burnout or minor strain injuries. Your body needs time to adapt to the new ranges of motion you’re asking of it. Connective tissue (tendons, ligaments, fascia) adapts much more slowly than muscle — pushing too hard too fast is how people end up with niggly injuries that take weeks to heal.
If you’re also doing strength training — weights, resistance bands, or bodyweight exercises at home — slot yoga on your rest days or after workouts as a cooldown. The combination of strength and flexibility training is far more effective than either alone.
The 10 Essential Poses for Flexibility
These are the poses that give beginners the most flexibility benefit per minute of effort. I’ve ordered them as a logical sequence you can follow as a complete session.
Mountain Pose (Tadasana)
This looks like standing still, and people often wonder why it’s included. The point is alignment awareness — learning to stand with your weight evenly distributed, your spine neutral, and your shoulders relaxed. It’s the reference position for everything else.
How to do it:
- Stand with feet hip-width apart, weight spread evenly across both feet
- Arms at your sides, palms facing forward
- Draw your shoulders back and down (not forced — just away from your ears)
- Crown of your head reaching upward, chin parallel to the floor
- Hold for 5-8 slow breaths
If this feels like nothing is happening, you’re doing it right. The value becomes obvious once you start moving into other poses and need to return to a neutral standing position.
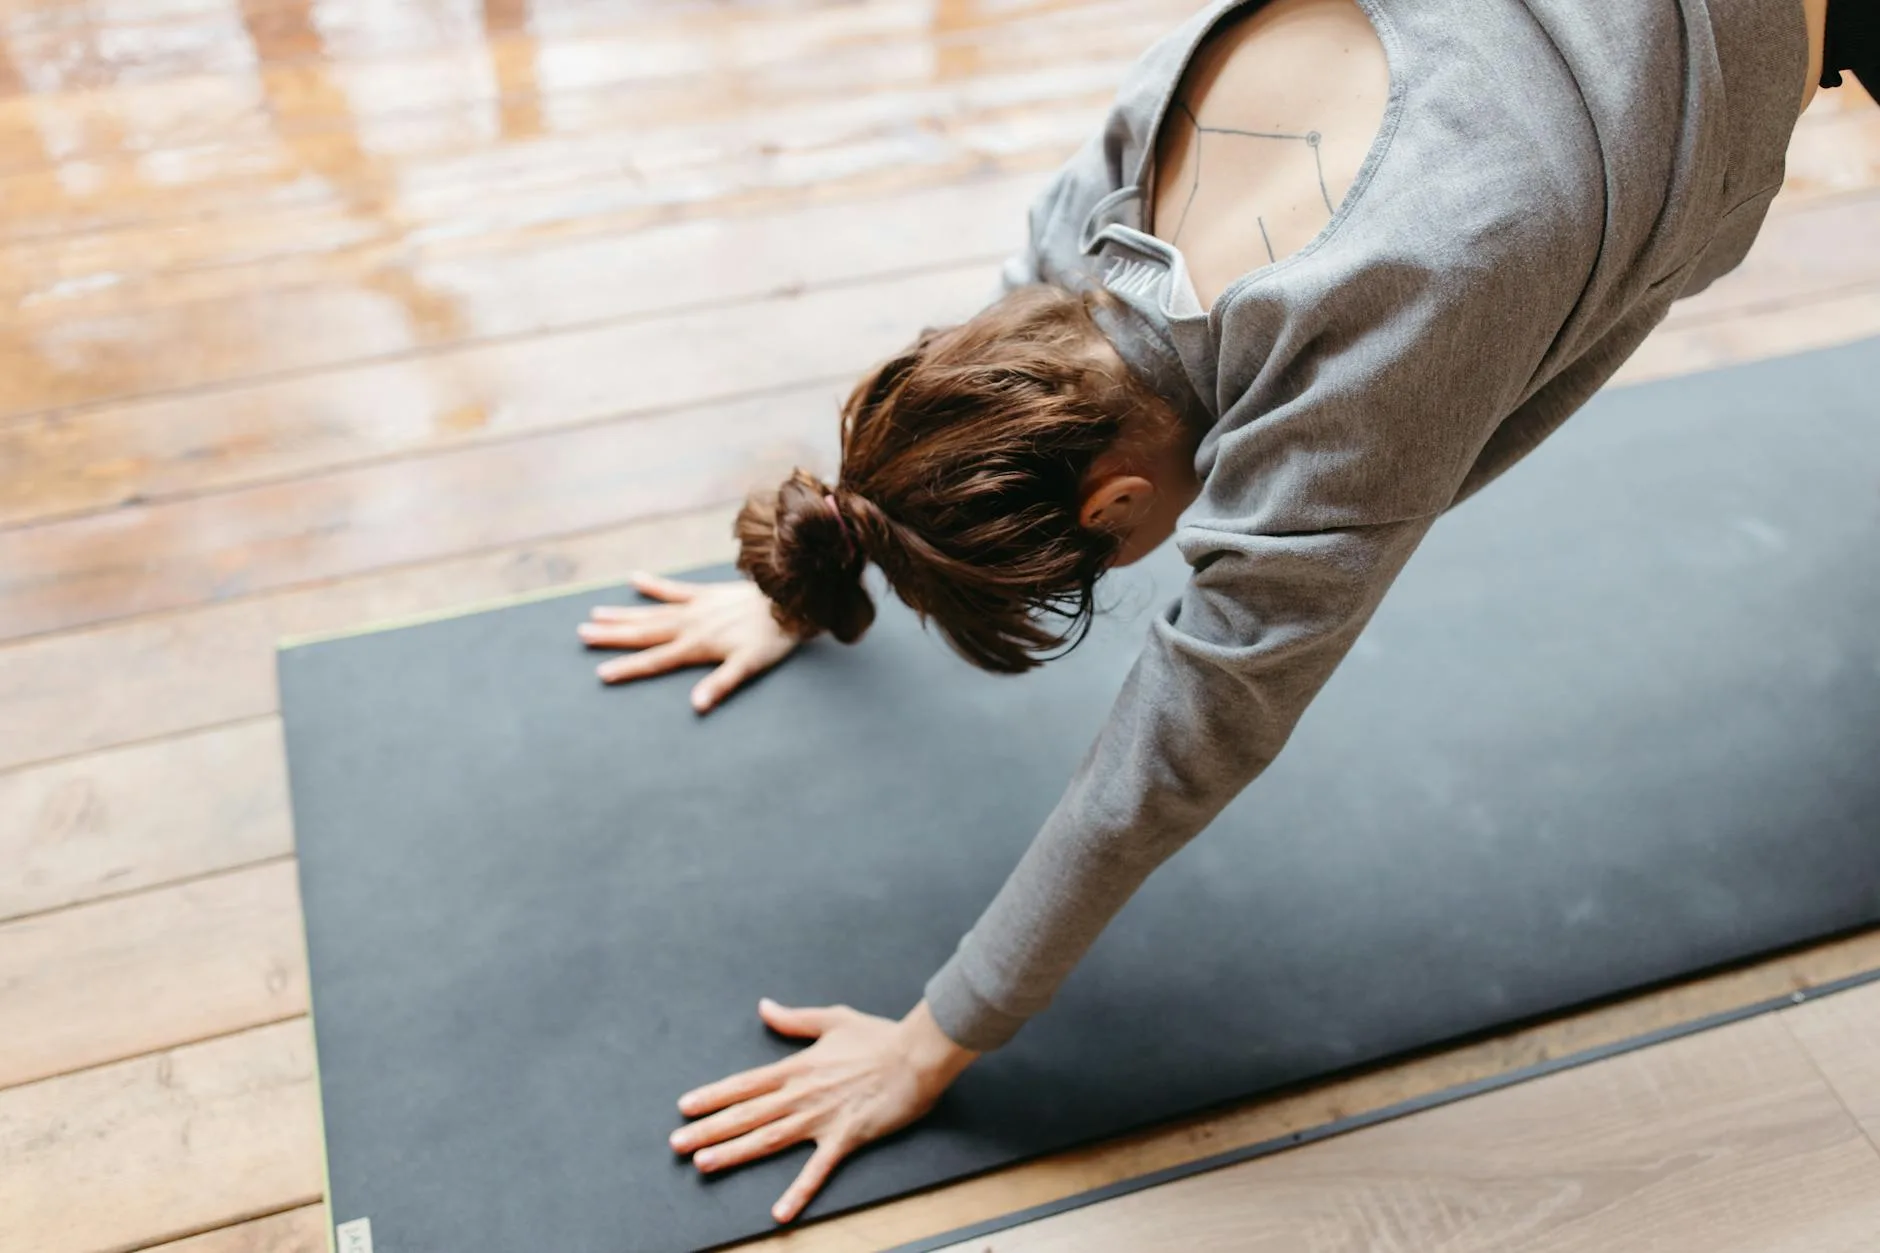
Downward-Facing Dog (Adho Mukha Svanasana)
Probably the most recognised yoga pose, and one of the most useful for flexibility. It stretches your hamstrings, calves, shoulders, and spine simultaneously.
How to do it:
- Start on hands and knees — hands shoulder-width apart, knees hip-width apart
- Tuck your toes and lift your hips up and back, straightening your legs as much as comfortable
- Your body should form an inverted V shape
- Press your hands firmly into the mat, fingers spread wide
- Let your head hang naturally between your arms
- Hold for 5-8 breaths
Beginner tip: Your heels probably won’t touch the floor. That’s completely normal — it can take months or longer. Bend your knees slightly if your hamstrings are screaming. The stretch should be firm but not painful. Pedalling your feet (alternately bending each knee) is a good way to ease into it.
Forward Fold (Uttanasana)
The classic hamstring stretch. It also decompresses the spine and stretches the calves.
How to do it:
- Stand with feet hip-width apart
- Hinge at the hips (not the waist — think of tipping your pelvis forward) and fold your torso towards your legs
- Let your arms hang heavy towards the floor
- Keep a slight bend in your knees, especially if your hamstrings are tight
- Hold for 5-8 breaths
Beginner tip: Forget about touching your toes. Seriously. The goal is a stretch through the back of your legs, not reaching a particular point on the floor. If your fingertips barely pass your knees, that’s fine. Use yoga blocks under your hands if the stretch feels too intense. Over time, your range will increase.
Low Lunge (Anjaneyasana)
This targets your hip flexors — the muscles at the front of your hip that get chronically tight from sitting. If you work at a desk, this pose alone could change how your hips feel.
How to do it:
- From standing, step your right foot forward into a lunge
- Lower your back knee to the mat (place a folded towel under it if uncomfortable)
- Your front knee should be directly over your front ankle
- Sink your hips forward and down gently
- Arms can rest on your front thigh or reach overhead for a deeper stretch
- Hold for 5-8 breaths each side
Beginner tip: The stretch should be felt in the front of the hip on the back leg. If you feel it in your front knee, your stance is probably too narrow — step your front foot further forward.
Warrior II (Virabhadrasana II)
A standing pose that builds leg strength while opening the hips and stretching the inner thighs. It looks dramatic but is actually quite accessible for beginners.
How to do it:
- Stand with feet about 1-1.2 metres apart
- Turn your right foot to point to the right, left foot angled slightly inward
- Bend your right knee over your right ankle (aim for 90 degrees, but don’t force it)
- Extend your arms out to the sides at shoulder height, palms down
- Turn your head to look over your right hand
- Hold for 5-8 breaths each side
Beginner tip: The most common mistake is letting the front knee drift inward. Actively push it out towards your little toe. Your thighs will burn — that’s normal. This is one of those poses where you’re building strength and flexibility simultaneously.
Triangle Pose (Trikonasana)
Excellent for stretching the hamstrings, inner thighs, and side body. It also builds core stability.
How to do it:
- Start in a wide stance (similar to Warrior II but with both legs straight)
- Turn your right foot out 90 degrees, left foot slightly in
- Extend your torso to the right, reaching your right hand towards your right shin, ankle, or a block on the floor
- Your left arm extends straight up toward the ceiling
- Keep your torso open (imagine you’re between two panes of glass)
- Hold for 5-8 breaths each side
Beginner tip: Place a yoga block behind your front ankle and rest your hand on it. This prevents you from collapsing your torso towards the floor, which defeats the purpose of the stretch. The openness of your chest matters more than how far down your hand reaches.
Cat-Cow (Marjaryasana-Bitilasana)
A gentle spinal mobility exercise that’s brilliant for loosening up a stiff back. It’s often used as a warm-up, but it’s valuable enough to include in every session.
How to do it:
- Start on hands and knees, wrists under shoulders, knees under hips
- Cow: Inhale, drop your belly toward the floor, lift your chest and tailbone upward, look slightly up
- Cat: Exhale, round your spine toward the ceiling, tuck your chin toward your chest, draw your belly button in
- Move slowly between the two positions, one breath per movement
- Repeat 8-10 times
This shouldn’t hurt. If any part of your back feels sharp pain rather than stretch, reduce the range of motion.
Pigeon Pose (Eka Pada Rajakapotasana)
The deep hip opener. This targets the glutes and the external rotators of the hip — muscles that get tight from sitting and from running. It’s intense, but the relief afterwards is worth it. For related guidance, see our Kettlebell Training for Beginners: Basic Moves & Technique guide.
How to do it:
- Start on hands and knees
- Bring your right knee forward and place it behind your right wrist
- Slide your left leg back, extending it straight behind you
- Your right shin can be at any angle — it doesn’t need to be parallel to the front of your mat
- Walk your hands forward and lower your torso towards the floor
- Hold for 8-10 breaths each side (this one benefits from longer holds)
Beginner tip: If this feels too intense on your knee, try the reclined version: lie on your back, cross your right ankle over your left knee, and pull your left thigh towards your chest. Same stretch, less pressure on the knee joint.
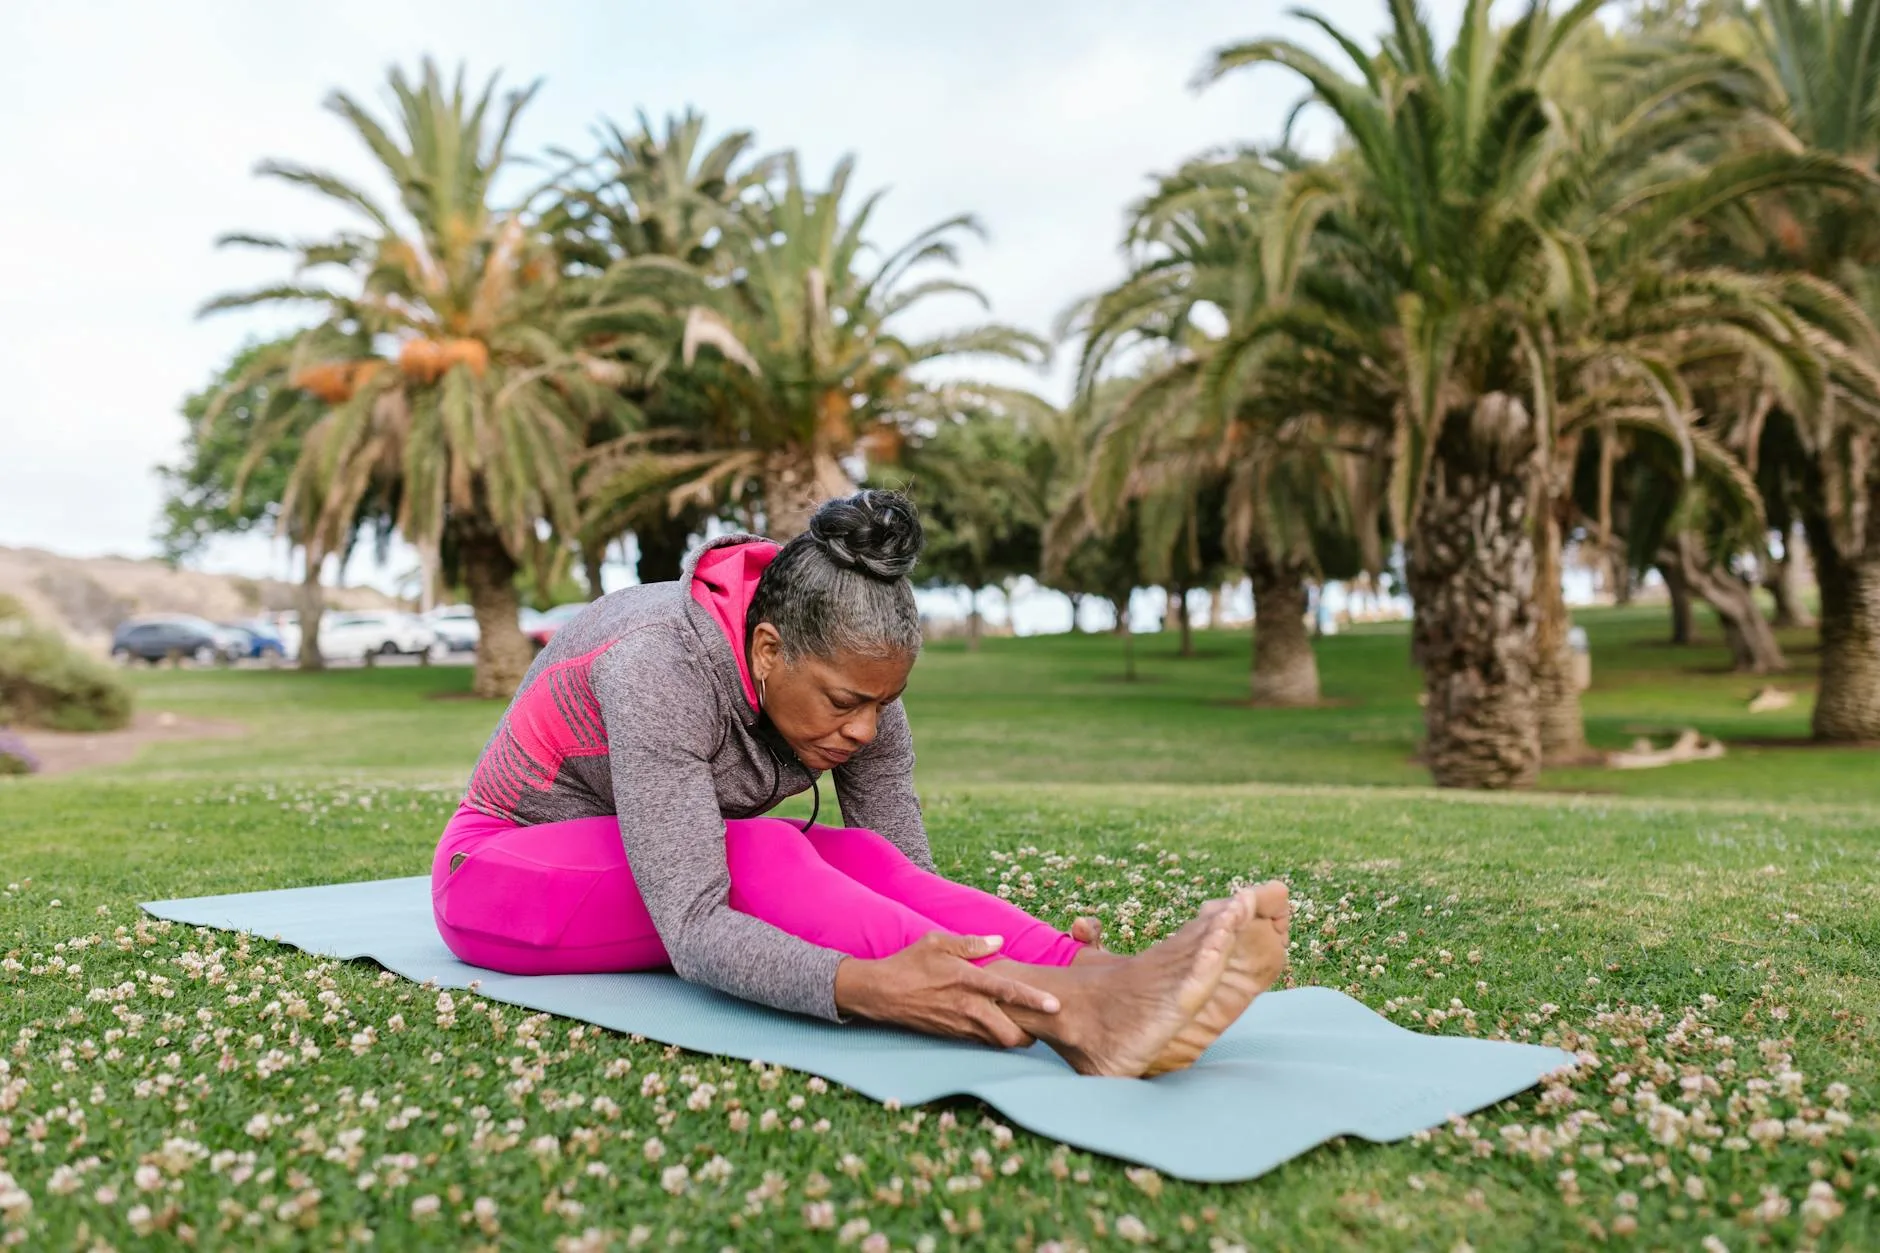
Seated Forward Fold (Paschimottanasana)
A seated hamstring stretch that also targets the lower back. It’s simpler than the standing version because you don’t need to balance.
How to do it:
- Sit on the floor with legs extended straight in front of you
- If your lower back rounds notably, sit on a folded blanket or cushion to tilt your pelvis forward
- Inhale and lengthen your spine upward
- Exhale and hinge forward from the hips, reaching toward your feet
- Hold wherever you feel a strong but tolerable stretch — this might be with your hands on your shins
- Hold for 8-10 breaths
Beginner tip: Loop a yoga strap (or a towel) around the soles of your feet and hold the ends. This gives you something to gently pull against while keeping your spine long. Never round your back aggressively to reach further — a straight spine with less range is better than a curved spine reaching your toes.
Child’s Pose (Balasana)
The rest position. Use it whenever you need a break between poses, or as a finishing pose. It gently stretches the hips, thighs, and lower back while giving you a moment to catch your breath.
How to do it:
- Kneel on the mat with big toes touching, knees apart (roughly hip-width or wider)
- Sit back on your heels
- Walk your hands forward and lower your forehead to the mat
- Arms can extend forward or rest by your sides — whichever is more comfortable
- Hold for as long as you like — 30 seconds to 2 minutes
This is your safe space. Whenever a pose feels too much, come back here. No one will judge you — even experienced yogis use child’s pose throughout their practice. For related guidance, see our How to Choose a Yoga Mat: Thickness, Material & Grip guide.
Common Beginner Mistakes
Knowing what to avoid saves you from frustration and injury.
Holding your breath: You’d be surprised how many people forget to breathe during challenging poses. If you’re holding your breath, you’ve gone too deep. Back off until you can breathe steadily through your nose.
Pushing through pain: Discomfort and stretch are normal. Sharp, stabbing, or “electric” sensations are not. Pain in a joint (rather than a muscle) is a red flag — ease off immediately. Yoga should challenge you, not injure you.
Comparing yourself to others: Whether that’s people in a class or people on YouTube. Flexibility is largely genetic and varies enormously. Someone who can fold completely in half on day one isn’t more “advanced” — they’re just more naturally flexible. Your progress is your progress.
Skipping the warm-up: Jumping straight into deep stretches with cold muscles is how you strain something. Cat-cow, gentle twists, and some walking on the spot are enough to warm up before deeper poses.
Going too fast: Yoga isn’t a race. Holding poses for longer with correct alignment does more than rushing through 20 poses in 10 minutes. Slow down, breathe, and let gravity do some of the work. For wider safety context, NHS flexibility guidance is a useful reference.
Building a 20-Minute Beginner Routine
Here’s a complete sequence you can follow at home, in order. It works as a standalone flexibility session or a post-workout cooldown.
- Mountain Pose — 1 minute (5-8 breaths, centering)
- Cat-Cow — 2 minutes (8-10 rounds)
- Downward-Facing Dog — 1.5 minutes (pedal feet to warm up)
- Low Lunge — 2 minutes (1 minute each side)
- Warrior II — 2 minutes (1 minute each side)
- Triangle Pose — 2 minutes (1 minute each side)
- Forward Fold — 1.5 minutes
- Pigeon Pose — 4 minutes (2 minutes each side)
- Seated Forward Fold — 2 minutes
- Child’s Pose — 2 minutes (rest and breathe)
Total: approximately 20 minutes. Adjust hold times based on how you feel. On days when everything feels tight, spend more time in the gentler poses and skip the deeper ones. On days when you feel loose, hold the deeper stretches longer.
If you’re tracking your heart rate during training, you’ll notice yoga sits firmly in zone 1-2. It’s active recovery, not cardio — and that’s exactly the point.
When to Move Beyond the Basics
You’ll know you’re ready for more when:
- You can hold downward-facing dog for a full minute without discomfort
- Your heels are touching or close to touching the floor in downward dog
- Forward fold brings your fingertips past your toes
- You can breathe calmly through all 10 poses without needing to rest
At that point, look into local yoga classes. Most towns in the UK have beginner-friendly sessions — check your local leisure centre, which often offers yoga for £5-8 per class. Hatha yoga is the best style for beginners (it’s slow and alignment-focused). Avoid hot yoga, power yoga, or Bikram until you’ve got 2-3 months of practice under your belt.
Online options are excellent too. YouTube channels like Yoga with Adriene (free) offer structured beginner programmes that progress week by week. The Downdog app (about £35/year) generates customised sessions based on your level and time available — really one of the better fitness app investments out there.
Frequently Asked Questions
How often should beginners do yoga for flexibility? Three sessions per week, 20-30 minutes each, is ideal for beginners. You’ll see flexibility improvements within 2-3 weeks at this frequency. Doing yoga daily is fine once your body adapts, but starting with three sessions avoids overuse strain on muscles and connective tissue.
Do I need to be flexible to start yoga? No. This is the biggest misconception about yoga. You don’t need to touch your toes or do the splits. Yoga is how you build flexibility, not a reward for already having it. Every pose can be modified with blocks, straps, or reduced range of motion.
Can yoga replace stretching after workouts? Yes. A 10-15 minute yoga sequence after lifting weights or cardio is more effective than random static stretches. Poses like downward dog, pigeon, and forward fold cover all the major muscle groups in a structured way. It’s also more engaging than holding the same three stretches you’ve been doing since school.
What’s the best time of day to do yoga for flexibility? Late afternoon or evening, when your body is naturally warmer and more flexible. Morning yoga is fine but expect to feel stiffer — ease into poses more slowly. If yoga is your post-workout cooldown, do it immediately after training while your muscles are warm.
Will yoga help with back pain from sitting at a desk? Often yes. Cat-cow, child’s pose, and pigeon pose specifically target the muscles that tighten from prolonged sitting. The NHS recommends gentle stretching and movement for lower back pain, and yoga provides exactly that. However, if you have disc issues or severe pain, see a physiotherapist before starting — some poses can aggravate certain conditions.